Using REF CURSOR in the Sample Application

In the following sections, you enhance the sample application to display a dynamically-generated list of job IDs and job titles in the Job field when they are inserting a new employee record.

To do this, you create a database function, GET_JOBS, that uses a REF CURSOR to retrieve a result set of jobs from the Jobs table. A new Java method, getJobs, calls this database function to retrieve the result set.

Creating a Package in the Database

The following steps create a new package in the database to hold a REF CURSOR declaration.

  1. Select the DatabaseNavigatorName tab to view it in the Navigator.
  2. Expand the Connection1 node to view the list of database objects. Scroll down to Packages. Right-click Packages and select New Package.
  3. In the Create PL/SQL Package dialog, enter JOBSPKG as the name. Click OK. The package definition is displayed in the Source Editor.
  4. Replace the line /* TODO enter package declarations (types, exceptions, methods etc) here */ with the following line, to declare a REF CURSOR as follows:
        TYPE ref_cursor IS REF CURSOR;
    
  5. Save the package.

Example 6-10 Creating a Package in the Database

CREATE OR REPLACE
PACKAGE JOBSPKG AS
    TYPE ref_cursor IS REF CURSOR;
END;

The code for the package is shown in Example 6-10:

Creating a Database Function

These steps create a database function GET_JOBS that uses a REF CURSOR to retrieve a result set of jobs from the Jobs table.

  1. In the Database Navigator, again expand the necessary nodes to view the objects in the HR database. Right-click Functions and select New Function from the shortcut menu.
  2. In the Create PL/SQL Function dialog, enter GET_JOBS as the name. Click OK. The definition for the GET_JOBS function displays in the Source Editor
  3. In the first line of the function definition, substitute JobsPkg.ref_cursor as the return value, in place of VARCHAR2.
  4. After the AS keyword, enter the following:
     jobs_cursor JobsPkg.ref_cursor;
    
  5. In the BEGIN block enter the following code to replace the current content:
      OPEN jobs_cursor FOR
      SELECT job_id, job_title FROM jobs;
      RETURN jobs_cursor;
    
  6. Save the function

Example 6-11 Creating a Stored Function

CREATE OR REPLACE FUNCTION GET_JOBS
RETURN JobsPkg.ref_cursor
AS jobs_cursor JobsPkg.ref_cursor;
BEGIN
  OPEN jobs_cursor FOR
  SELECT job_id, job_title FROM jobs;
  RETURN jobs_cursor;
END;

The code for the function is shown in Example 6-11.

Calling the REF CURSOR from a Method

These steps create a Java method, getJobs, in the DataHandler class that calls the GET_JOBS function to retrieve the result set.

  1. Double-click DataHandler.java to open it in the Source Editor if it is not already open.
  2. Enter the method declaration.
    public ResultSet getJobs() throws SQLException {
     
    }
    
  3. Within the method body, connect to the database.
      getDBConnection();
    
  4. Following the connection, declare a new variable, jobquery:
      String jobquery = "begin ? := get_jobs; end;";
    
  5. Create a CallableStatement using the prepareCall method:
      CallableStatement callStmt = conn.prepareCall(jobquery);
    
  6. Register the type of the OUT parameter, using an Oracle-specific type.
      callStmt.registerOutParameter(1, OracleTypes.CURSOR);
    
  7. When you specify that you want to use an Oracle-specific type, JDeveloper displays a message asking you to use Alt+Enter to import oracle.jdbc.OracleTypes. Press Alt+Enter, and then select OracleTypes (oracle.jdbc) from the list that appears.
  8. Run the statement and return the result set.
      callStmt.execute();
      rset = (ResultSet)callStmt.getObject(1);
    
  9. Enclose the code entered so far in a try block.
  10. Add a catch block to catch any exceptions, and call your logException method as well.
    catch ( SQLException ex ) {
      logException( ex );
    }
    
  11. After the close of the catch block, return the result set.
    return rset;
    
  12. Make the file to check for syntax errors.

The code for the getJobs method is as follows:

  public ResultSet getJobs() throws SQLException {
  try {
    getDBConnection();
    String jobquery = "begin ? := get_jobs; end;";
    CallableStatement callStmt = conn.prepareCall(jobquery);
    callStmt.registerOutParameter(1, OracleTypes.CURSOR);
    callStmt.execute();
    rset = (ResultSet)callStmt.getObject(1);
  } catch ( SQLException ex ) {
  logException( ex );
  }
  return rset;
  }

Displaying a Dynamically Generated List

To create the list displaying the list of job IDs and job titles in the Insert page, you hard-coded the job IDs and job titles. In the following steps, you replace this with a dynamically-generated list provided by the REF CURSOR created in the previous section.

  1. Double-click insert.jsp in the Application Navigator to open it in the Visual Editor, if it is not already open.
  2. Click and select the Page Directive on the top left corner of the page. The Property Inspector now shows the properties of the Page Directive.
  3. Click the down arrow next to the Import field. The Edit Property: Import dialog box is displayed. Select the Hierarchy tab and then select ResultSet after extending Java and SQL folders respectively. Click OK.
  4. Drag a scriptlet onto the page next to the Page Directive. In the Insert Scriptlet dialog box, add the following code to execute the getJobs method and return a result set containing a list of jobs.
    ResultSet rset = empsbean.getJobs();
    
  5. Select the ListBox component in the page (the component to enter the job in the form), and click Scriptlet in the JSP Component Palette. (You need not drag and drop the scriptlet onto the page in this case.) The Insert Scriptlet dialog box appears.
  6. Enter the following code into the Insert Scriptlet dialog box. Click OK.
      while (rset.next ())
       {
        out.println("<option value=" + rset.getString("job_id") + ">" + 
        rset.getString("job_title") + "</option> "  );
       }
    
  7. Remove the hard-coded values as follows.

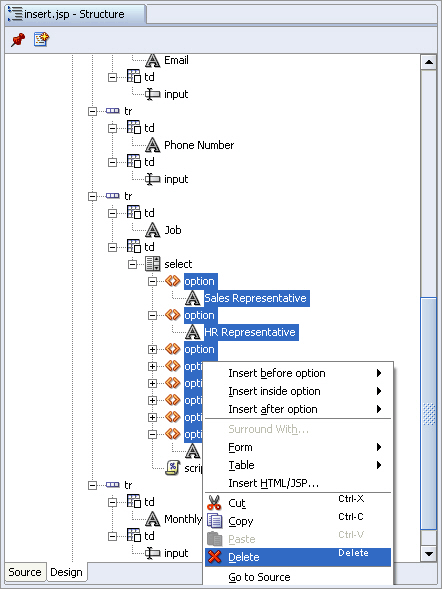
    With the ListBox component still selected, in the Structure window scroll to Job field. Examine the list of hard-coded options below the select keyword. Delete each of the options, ensuring that you retain the scriptlet.

    Figure 6-3 Structure View of ListBox Options

    Description of Figure 6-3 follows
    Description of "Figure 6-3 Structure View of ListBox Options"
  8. Save the page.

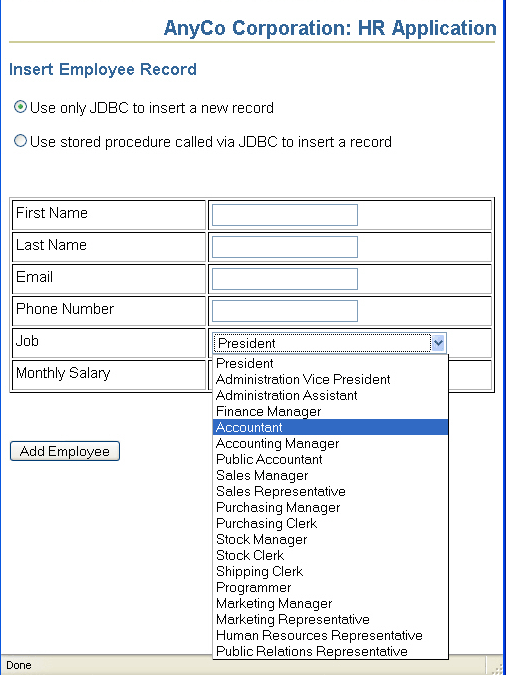
Now run the application, click to insert a new employee and use the list to display a list of available jobs. Figure 6-4 shows the dynamic jobs list in the browser.

Figure 6-4 Dynamically Generated List in Browser
Description of Figure 6-4 follows
Description of "Figure 6-4 Dynamically Generated List in Browser"