Connecting to Oracle Database from JDeveloper
You can set up and manage database connections in JDeveloper to enable your application to communicate with external data sources, including Oracle Database 12c Release 2 (12.2) and offline database objects. This is done using the Database Navigator. The same navigator is also used to manage other connections your application needs, such as connections to application servers. The following subsections describe how you can use the Database Navigator to view the database and its objects and to create a connection to the database:
JDeveloper Database Navigator
The Database Navigator displays all currently defined connections. To view the Database Navigator, select the Database Navigator tab in the navigator panel on the top left-hand side of the JDeveloper display, if it is displayed, or use the View menu. For an illustration of the default layout of the JDeveloper IDE, see Figure 1-1.
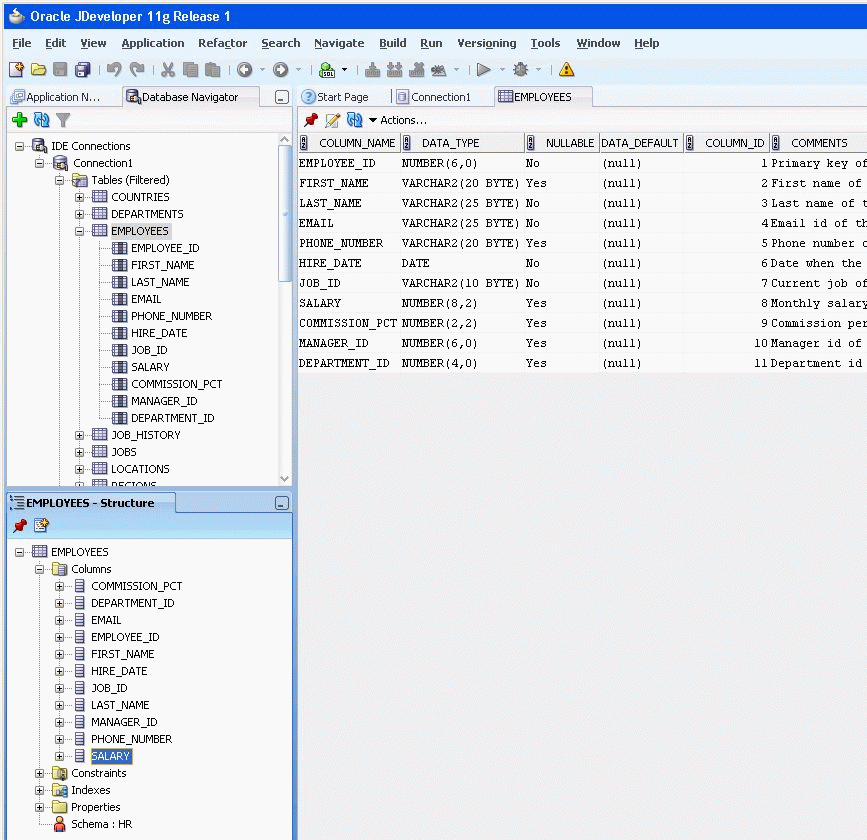
You can use the Database Navigator to browse through the connections it displays. In particular, for a database schema, you can also view database objects, tables, views, and their contents.
Database connections are shown under the IDE Connections node. To view the objects in the database, expand the connection. Expanding a schema displays nodes for the object types in that schema. Expanding the node for an object type displays its individual objects. When you expand a table node, you can view the structure of the table and the data within the table.
Creating a Database Connection
You can connect to any database for which you have connection details. When you create a database connection, you must specify a user name and a password. By default, the connection enables you to browse only the schema of the user that you specify in the connection.
To create a connection, follow these steps:
-
Start JDeveloper.
-
From the View menu, go to Database and select Database Navigator. The Database Navigator is displayed, showing you a list of available connections.
-
Right-click IDE Connection, and from the shortcut menu, select New Connection. The Create Database Connection screen is displayed.
-
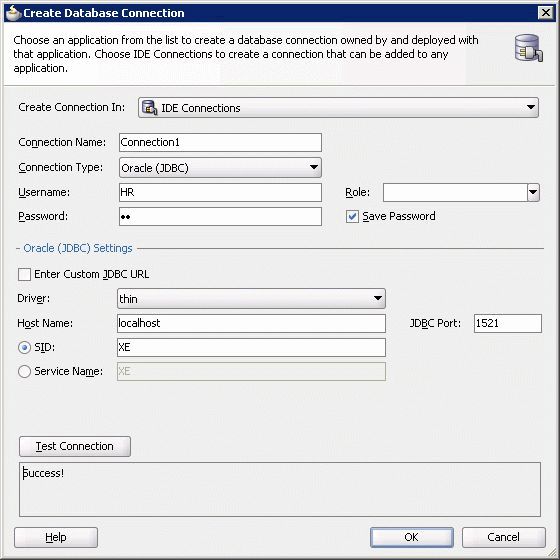
On the Create Database Connection screen, do not change the default values for the connection name and type,
Connection1andOracle (JDBC). EnterHRin both the Username and Password fields. Do not enter a value for Role, and select Deploy Password. You must provide information about the computer where your database is located. Your database administrator should provide you with this information.Enter the following information:
-
Driver:
thin -
Host Name:
Host name of the computer where Oracle Database 12c Release 1 (12.1) is installedIf the database is on the same computer, then for the Host Name parameter, enter
localhost. -
JDBC Port:
1521
Click Test Connection. If the connection is successful, the word Success! is displayed in the Status field.
Figure 3–1 shows the Connection screen where you enter these details.
-
-
Click Finish to create the connection and close the screen.
Disconnecting and Reconnecting from Oracle Database in JDeveloper
To disconnect from the database in JDeveloper, in the Database Navigator, right-click the connection name and select Disconnect. The display in the Database Navigator now shows only the name of the connection, without the plus (+) symbol for expanding the node. To reconnect to the database, right-click the connection name and select Connect.
Browsing the Data Using the Database Navigator
After you have successfully established a connection to the database, you can browse its contents through the Database Navigator. The Database Navigator displays a navigable, hierarchical tree structure for the database, its objects, their instances, and the contents of each. To view the contents at each level of the hierarchy of the database connection that you created, do the following:

